
Launching Apollo to the Edge of Space
Seven years ago, we debuted our flagship product, the Apollo Shirt on Kickstarter, and as a celebration of our record-setting campaign, we launched the Apollo Shirt on a balloon to the edge of space.
Abstract
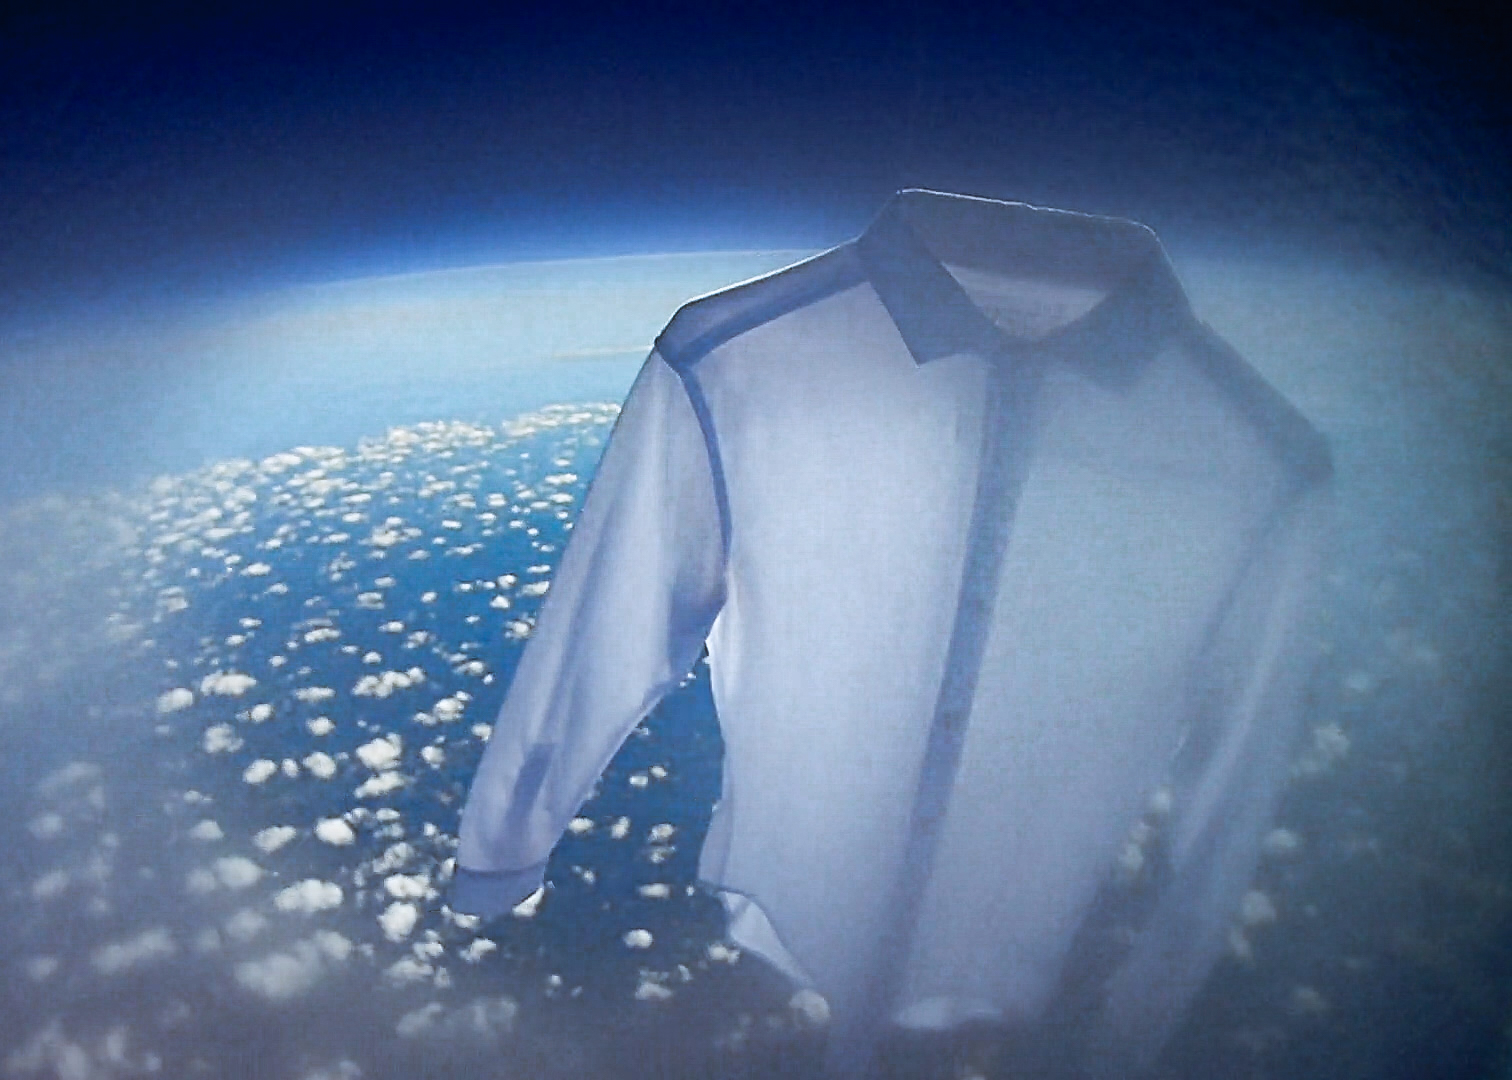
The Apollo Shirt features Phase Change Materials, originally developed for the gloves of NASA’s spacesuits in order to keep astronauts at just the right temperature. Now to commemorate the 50th anniversary of the Apollo lunar landing, we thought it was only fitting to launch the Apollo shirt to the upper edges of stratosphere and try to capture an image of the darkness of space. Here’s how we did it.
Introduction
Weather balloons are commonly used by NASA and other meteorological agencies to study the atmosphere, they work on a simple principle of buoyancy to elevate the balloon up to 160,000ft (30.3 miles) above sea level. Buoyancy works when a less dense fluid displaces a denser fluid and the difference in weight (mass * gravity) of the two fluids is the lifting force. As long the displaced volume weighs less than the air it displaces the item will float - just as the air in a boat causes it float in water. If the displaced volume is exactly the same as the fluid, the item will float - and that’s how NASA simulates zero-gravity in their Neutral Buoyancy Lab (it’s the same effect as floating in space due to orbit, but in that case the astronauts are actually falling at the same rate as the curvature of the Earth… but that’s a different story).

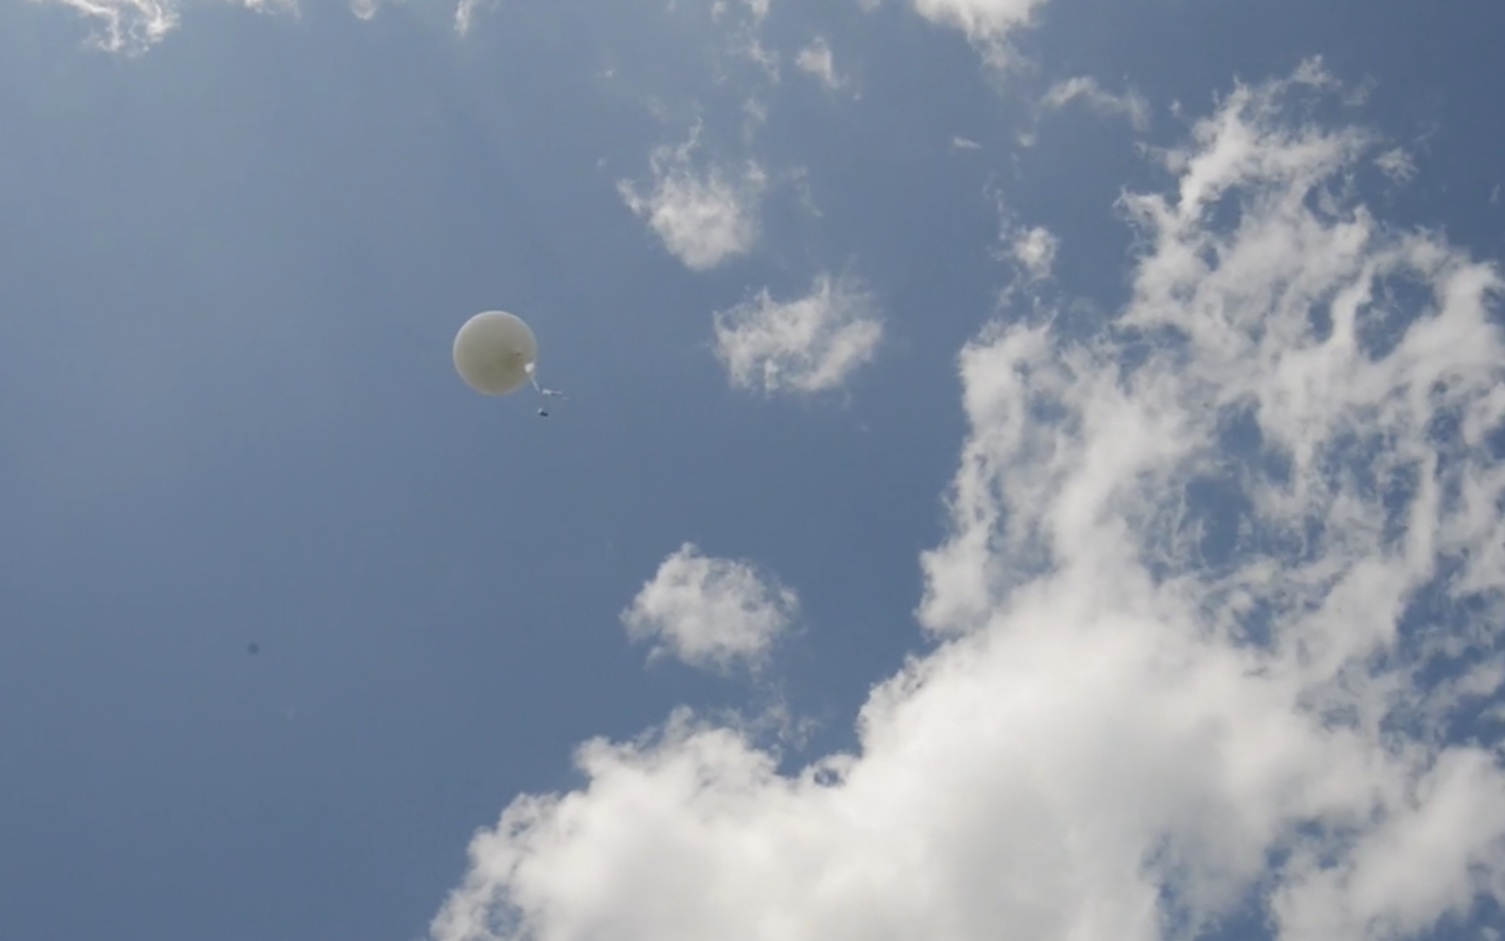
The weather balloon rises with a lighter-than-air lifting gas (in this case helium), and as it rises the air around it becomes less dense, causing the balloon to expand, from 6ft in diameter to 20ft in diameter. The air density in the upper stratosphere, is up to 1/200th the density on the surface of the Earth. With that little pressure, the balloon eventually pops and returns back to the surface via a parachute.
Materials
1200g 20 ft Weather Balloon designed for up to 15lb payloads.
150 cubic feet of lifting gas (He)
GPS Tracker
HD Action Camera
4 Zip ties
Lightweight cord
4 Foot Parachute
Plastic container
Styrofoam Panelling
Handwarmers
Modified Clothes Hanger
Wire Rig
Methods
We built the camera rig by creating a wire pyramid that allowed us to constrain the orientation of the shirt, as well as the camera box each suspended 6 inches below.
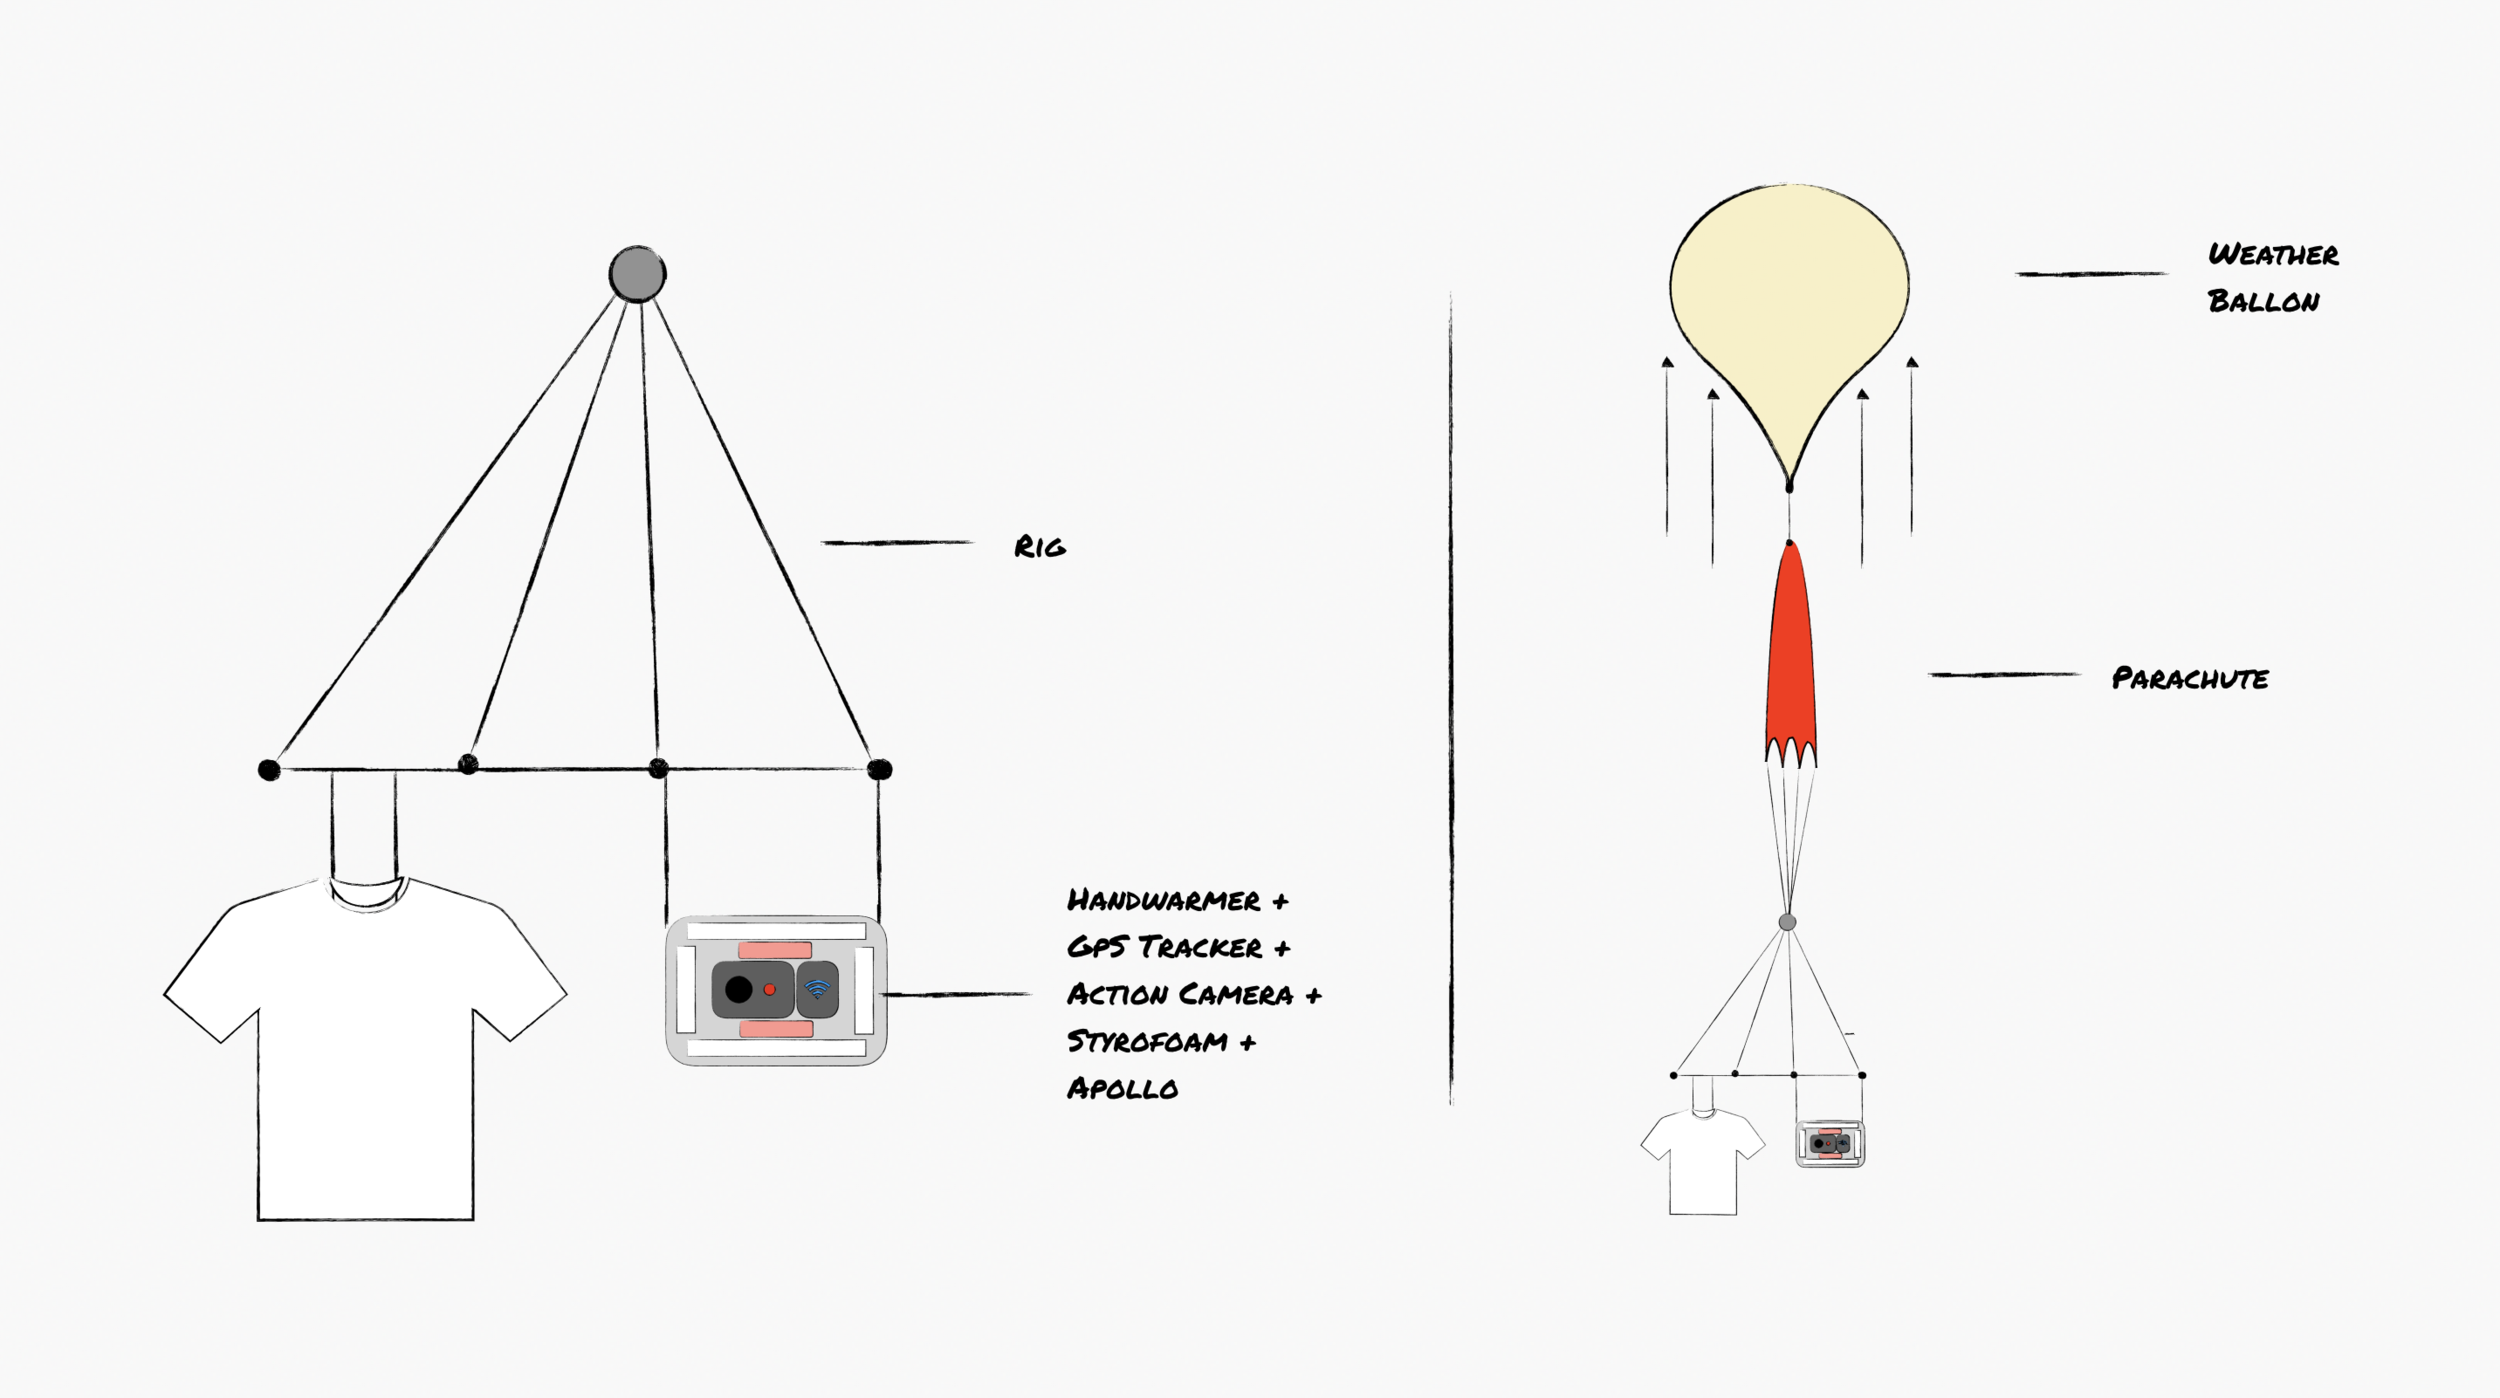
The camera box was a plastic container, with a hole for the action camera set to record for up to 5 hours. We also adhered an inexpensive GPS tracker next to the tracker, and surrounded the electronics with activated hand warmers to keep them warm in the -50F expected temperature at 50,000+ feet. The box was then insulated with styrofoam panelling and sealed shut.

A possible flight path during our planning, during the actual launch the winds were more westerly.
We used a high-altitude balloon simulator to predict the expected landing zone based on the weather, particularly wind on the day of launch and adjusted our launch site accordingly to avoid active airspaces through the flight path. Check with the FAA and NOTAM notices to ensure you’re in a safe airspace. Balloons with less than 4lb payloads are unregulated.


Launching from Amherst, MA we were able to ensure that the balloon would land in accessible areas with a low probability of ending up in the ocean. A team of four of us filled the balloon based on our payload and desired altitude and secured the rig ensuring there was enough lift, but not overfilling the balloon. Overfilling the balloon can cause the balloon bursting at lower altitudes. At 2:28pm we released the balloon, we had GPS tracking for roughly 7 minutes until the balloon hits 8,000 ft - and lost cell reception. We drove toward the anticipated landing site in Central Massachusetts and waited for GPS tracking to recover.
Results
At 4:57pm after a 2:29 hour flight time we picked up GPS tracking for a recovery site in Sterling, MA. We were incredibly fortunate that the camera had landed in a field and had stayed clear of trees.
Weather: 85ºF, 9 mph WSW, 45% Rh%
Flight Time: 2 hours 29 minutes
Estimated Altitude: 110,000-120,000 ft
Distance Travelled: 39 miles

GPS tracking from our transmitter recorded position and time data over the course of the flight.
Conclusion

We were able get over 2 hours of incredible video before our camera battery died, nearly reaching the apex of the flight. On launch, the balloon had passed through cloud, leading to significant condensation within the camera box and the lens, however, it was primarily on the perimeter of the lens giving a clear shot of the background behind. We’re pretty excited about this particular shot!